Overview
Authorize.net is one of the payment gateways that can be used with GoMembers OnDemand. If you signed up to authorize.net and have your account set up, you need to configure GoMembers OnDemand to have the integration working.
Information
These are the steps to create a new authorize.net gateway in OnDemand:
Note: Customers must set up their account with authorize.net before configuring the integration with OnDemand. The OnDemand support team does not create an account with authorize.net and does not have any agreement to provide accounts with a discount.
- Log in to your GoMembers OnDemand instance.
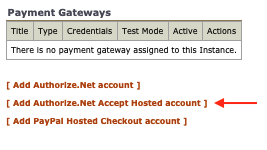
- On the top-right corner, click Connect.
- Click Payment Gateways under Instance Admin.
Note: If you do not have access to this module, please create a support ticket, and the support team will configure it for you. Do not include sensitive information in the ticket, such as the login id, trans key, or signature key. Check how to send them securely on OnDemand: Sending Sensitive Information To The Support Team. - Click Add Authorize.Net Accept Hosted Account.
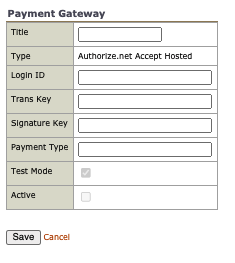
- Fill in the details:
- Title: A name to identify this gateway.
-
Login ID, Trans Key, and Signature Key: Information provided by authorize.net to identify and authenticate your account.
Note: If you need to send this information to the support team, please check how to do that securely on OnDemand: Sending Sensitive Information To The Support Team.
- Click Save.
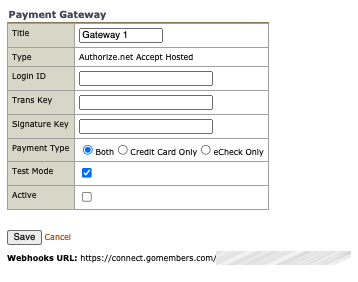
- Locate the gateway on the list and click Edit.
- Configure the remaining fields:
- Payment Type: Configure according to what has been contracted.
- Test Mode: Leave it checked until you know it is working.
- Active: Check the flag to activate this gateway.
- Copy the URL below the Save button and store it, as you will need to add it to your account in authorize.net.
- Click Save.
- Go to authorize.net to finish the configuration.
-
Make sure you enabled the Transaction Details API:
- Under Account Management (in the left menu), click Settings.
- In the Security Settings section, click Transaction Details API.
- If it is not enabled, enter the answer to your secret question. Then, click Enable Transaction Details API.
- When it is successfully enabled, you will be sent back to the Settings page.
- Add the OnDemand URLs:
- These are the URLs you will need to add:
- https://connect.computility.com/sim/relay_response.php
- https://connect.gomembers.com/sim/relay_response.php
- https://connect.computility.com/sim/sim_receipt.php
- https://connect.gomembers.com/sim/sim_receipt.php
- https://connect.computility.com/sim/thankyou.php
- https://connect.gomembers.com/sim/thankyou.php
- On the Settings page, click Response/Receipt URLs.
- For each URL on the list above:
- Click Add URL.
- Copy the URL and paste it on the URL field.
- Click Submit.
- These are the URLs you will need to add:
- Add the OnDemand webhook:
- Click Account on the main toolbar. Then, under Business Settings and Notification Settings, click Webhooks.
-
Click Add Endpoint and enter the following information:
- Name: It is optional but it could be something like "GoMembers <account name>".
- Endpoint URL: The URL you copied in step 9.
- Status: Active
- Select the events to subscribe to:
- Customer Events: These events are associated with Customer Information Manager (CIM) and customer profiles, along with the underlying payment and shipping profiles you have created and saved. Gomembers do not use these notifications. No action is needed here.
-
Subscription Events: These events are associated with Automated Recurring Billing (ARB) and the automated charging of customers on a subscription. Check all subscription events:
- Subscription Cancelled
- Subscription Created
- Subscription Expiring
- Subscription Suspended
- Subscription Terminated
- Subscription Updated
-
Payment Events: These events are associated with general payment events. Check all payment events:
- Authorize & Capture Created
- Authorize Only Created
- Capture Only Created
- AFDS/Fraud Approved
- AFDS/Fraud Declined
- AFDS/Fraud Hold/Held
- Prior Authorization Capture Create
- Refund Create
- Void Create
- Click Save.


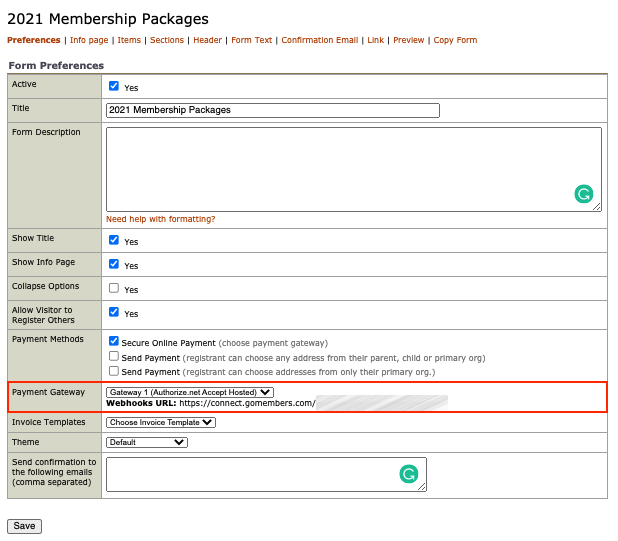
Using The New Payment Gateway On A Connect Form
Please follow these steps:
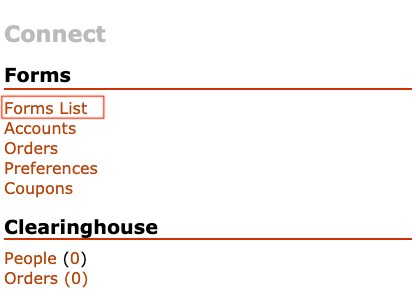
- On Connect, click Forms List under Forms.
- Locate the form that will be configured and click the form name.
- Go to the Preferences tab and select the gateway you have just created on the Payment Gateway field.
- Click Save.

Priyanka Bhotika
Comments